 USD
USD
 ($) AUD
 (₹) INR
 ($) CAD
 (R$) BRL
 (€) EUR
 ($) HKD
 (¥) JPY
 (RM) MYR
 ($) MXN
 ($) NZD
 (₱) PHP
 (£) GBP
 ($) SGD
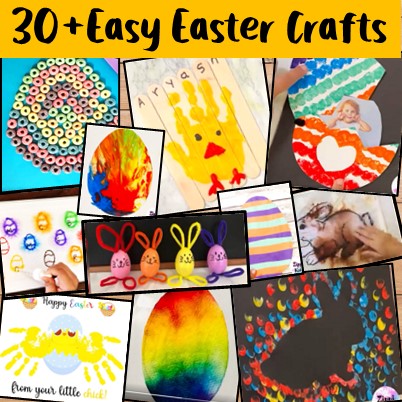
30+ Easy Easter Crafts and Activities for Preschool
What better way to help your preschool and Kindergarten students celebrate Easter than by completing these easy Easter crafts. Students can easily complete these Easter activities with a few supplies and a little support. Check out these 20 adorable Easter crafts below.
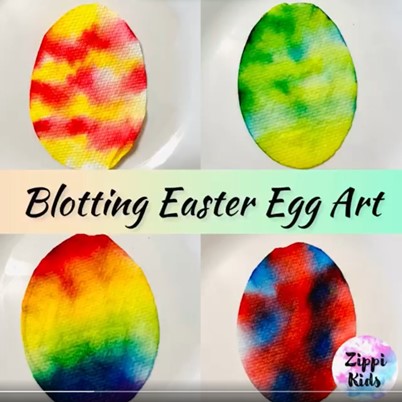
Blotting Easter Egg Art
A simple Easter activity that helps your Kindergarten and Pre-K students strengthen their fine motor skills while also having fun! Students will also enjoy seeing how colors can mix to form new colors once they hit the paper towel.
All you need to bring this Easter egg project to life is a paper towel, washable markers, a dropper, and some water! Preschool children will love squeezing the dropper and watching as the colorful marker dyes their paper towel egg.
Supplies Needed:
● A sheet of a paper towel
● Washable markers in different colors
● A dropper
● Water
To Make:
● Begin by folding a sheet of paper towel three times. Then, draw the shape of an egg on the sheet and cut it out.
● Have students color their Easter eggs with washable markers. Remind them to use various colors and create different designs.
● Next, fill a dropper with water. Have students squirt the water on their eggs and watch as the colors change!
Passing the Eggs Fun Easter Game
Looking for a fun, low-prep game to give students practice with fine motor skills and hand-eye coordination? This kindergarten Easter activity is always a hit!
You’ll just need to gather a few supplies to help students practice those pivotal hand-eye coordination and fine motor skills. Simply grab some empty toilet paper rolls, plastic Easter eggs, and a basket, and you’re ready to set up this engaging activity.

Supplies Needed:
● Empty toilet paper rolls (we recommend 5 or so)
● Plastic Easter eggs
● A basket
To Setup:
● Form a line of toilet paper rolls across the table.
● Place one plastic egg in the first toilet paper roll.
● The student will pick up the roll containing the egg and slowly transition the egg to the next toilet paper roll without dropping it.
● The student will continue playing until the egg has been passed from each toilet paper roll, finally making it to the basket at the end!
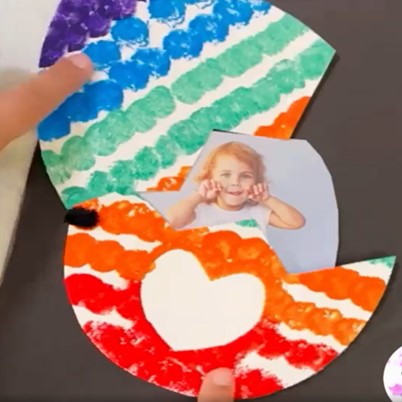
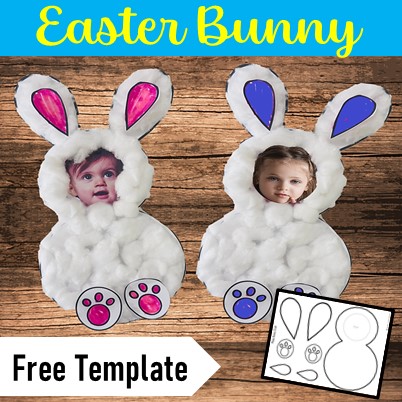
Easter Egg Craft
This cute Easter egg craft is the perfect way to showcase student photos. Plus it gives students a chance to dab paint on their egg which helps hone those important fine motor skills!
Students and adults alike will be amazed by this adorable Easter craft which is easy to assemble and perfect to display. Just grab a few supplies such as construction paper, a clothespin, a pom pom ball, paint, and the child’s picture to bring this cute Easter craft to life.
Supplies Needed:
● Construction paper
● Scissors
● A heart cutout made from construction paper
● Paint
● Pom pom balls
● Clothespins
● A photo of the student
● A hole puncher
● A small piece of ribbon
To Make:
● Draw an egg shape onto a piece of construction paper. You can grab our free printable here.
● Place a small heart cut out of construction paper onto the center of the egg.
● Affix pom poms to clothespins and allow students to dip them in paint to paint the egg. Have students paint the entirety of the egg.
● Once the paint is dry, cut the egg in half using a zigzag pattern.
● Hole punch one side of the egg on both halves and tie it together with a small piece of string or ribbon.
● Then, affix the child’s photo behind the egg and watch how proud your students are of how this adorable craft turned out!
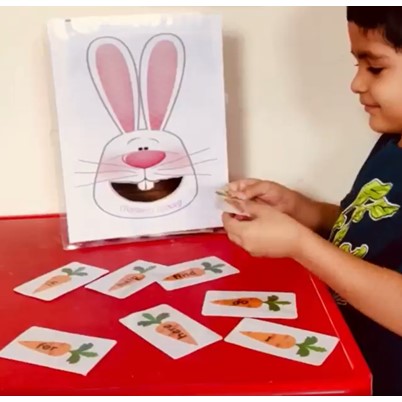
Feeding Sight Word Carrots to a Bunny
Featuring a cute bunny with a mouth cut out and carrot sight word cards, this activity gives Kindergarten students the opportunity to practice reading sight word cards with a fun Easter spin.
Students will enjoy choosing a sight word card to read and then feeding it to the bunny once they read it correctly! This is an exciting way to give students extra practice with those must-know high frequency words.
Supplies Needed:
● Printable pre-primer sight word cards (includes editable template)
● Printable bunny
To Setup:
● Print the bunny on cardstock or regular paper. Cut out the bunny’s mouth. Laminate the bunny if you did not use thicker paper.
● Affix the bunny onto something such as a basket to hold it upright.
● Print off and then cut apart the editable sight word cards.
Easter Egg Sight Word Match
Have a lot of plastic Easter eggs lying around? Use them to practice sight words, numbers, letters, shapes, and more! Kindergarten and Pre-K students will gain practice using their fine motor skills as they locate matching ends of an Easter egg and then put them together!
All you need to do to prep this activity is grab your plastic Easter eggs and a Sharpie. You’ll have this reusable activity ready to go in no time!

Supplies Needed:
● Plastic Easter eggs
● Sharpie
To Setup:
● Grab your plastic Easter eggs.
● Write the same shape, letter, number, sight word, etc. on each side of an egg.
● Pull the egg apart and place both ends on the table. Once all eggs are finished spread them out on your table.
● Students will get to work matching the parts of their egg and practicing Kindergarten content while they do so!
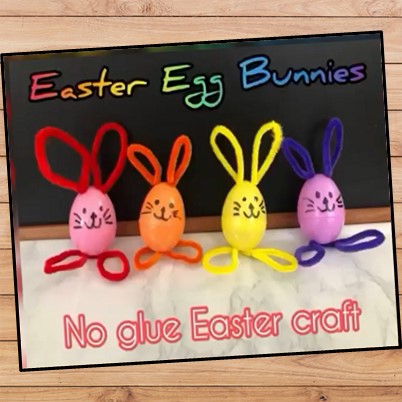
Easter Egg Bunnies
This is one of the cutest Easter crafts on this list! It’s perfect as a fun Easter activity or to add to an Easter basket. All you need to make your own Easter egg bunny is a plastic egg, pipe cleaners, and a Sharpie!
Students will love selecting their own egg and pipe cleaners to make their individual bunny come to life!
Supplies Needed:
● A plastic egg
● Pipe cleaners
● A Sharpie
● Scissors
To Make:
● Gather two pipe cleaners. One will be used as ears and one will be used as feet.
● For the feet, slide the ends of the pipe cleaner through the holes on the bottom of the egg. Open the egg and twist the ends of the pipe cleaner together on the inside of the egg.
● Next, close the egg, and form the portion of the pipe cleaner on the outside of the egg into ears. Twist each ear on the bottom to help the feet stay intact.
● Then, grab another pipe cleaner. Grab scissors and cut it in half.
● Place both ends of the pipe cleaner through a hole in the top of the egg. Form the shape of an ear and then twist it to help it retain its shape. Repeat this for the other ear.
● Finally, grab your Sharpie and draw on a face. Don’t forget to add eyes, a nose, a mouth, and whiskers. Manipulate the feet so that your Easter egg bunny will stand, and you’ve finished!
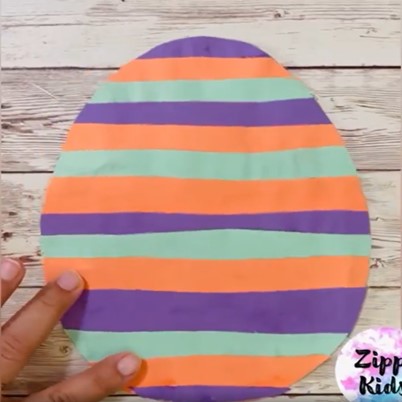
Easter Egg Fine Motor Craft
Want to give your students extra practice with using scissors? This craft is perfect for practicing the fine motor skill of cutting. Plus, it can give your students practice with creating patterns, which is something they will practice again and again during Preschool and Kindergarten math activities.
This fine motor craft allows students to work independently to create a patterned Easter egg craft that they’re proud of!
Supplies Needed:
● Easter egg outline on paper - draw it or print it here
● Colorful construction paper
● Scissors
● Glue
To Make:
● Print out the outline of an Easter egg or draw one on a sheet of paper.
● Gather 2-3 sheets of construction paper. Stack them up so that they are all in one pile.
● Fold the sheets of paper in half hamburger style twice.
● Then, have students cut the paper into 1 inch strips.
● Next, put glue all over the Easter egg.
● Have students place their strips of paper onto the egg to make a colorful pattern.
● After, turn the paper over and cut the egg out using the black outline.
● Your Pre-K students will love the end result of this too cute craft.
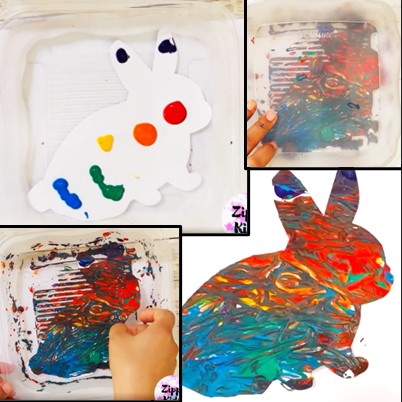
Bunny in a Box Easter Art
If you’ve never done marbling art, the process is so fun for students! Plus, it doesn’t make a mess which makes it even better. Students will love watching as these supplies work together to create a beautiful picture.
Students will love creating this process art as they shake the box and move their marble across the bunny!
Supplies Needed:
● A bunny outline printed or drawn
● Scissors
● Paint in different colors
● A box with a lid
● 2-5 marbles
To Make:
● Print or draw a bunny on paper. Then, cut it out.
● Tape the bunny outline into the bottom of a box with a lid.
● Squirt dots of paint in different colors all over the bunny.
● Place 2-5 marbles in the box.
● Then, put the lid on the box.
● Have students shake and move the box in order to move the marbles around.
● Once finished, the marbles should have spread the paint all across the page.
● Let the marble art dry and watch as your preschool students see the marble art magic that they made!
Minute to Win it Easter Games
These minute to win it games are a fun way for kids to practice their fine motor skills and hand-eye coordination. Students will love racing against a timer or seeing how much they can accomplish in a short period of time.
Grab your plastic Easter baskets, Easter eggs, and a couple more supplies and your kids will be zipping to complete these games in no time.

Supplies Needed:
● Easter basket
● Plastic Easter eggs
● Plastic spoons
● Empty toilet paper rolls
To Setup & Play:
Game 1: Easter Eggs Color Match
● Grab an Easter basket and fill it with plastic Easter eggs that have been separated.
● Grab an empty Easter basket to sit beside the first basket. Have students put as many eggs back together as possible as quickly as they can. Students will love trying to move quickly to get these eggs put back together!
Game 2: Easter Eggs and Spoon Relay Race
● Fill an Easter basket with Easter eggs.
● Grab another Easter basket and put it across the room.
● Have students use a plastic spoon to scoop the Easter eggs up and then walk as quickly as they can to the other basket without dropping the egg. Students will continue playing and trying to get as many eggs to the second basket as they can!
Game 3: Easter Eggs Transfer
● Grab two Easter baskets and place them on a table.
● Fill one basket up with Easter eggs.
● Give students a plastic spoon and have them scoop and move as many eggs as they can over to the second basket.
Game 4: Easter Egg Relay with Toilet Paper Roll
● Fill an Easter basket with Easter eggs.
● Grab another Easter basket and put it across the room.
● Have students use an empty toilet paper roll to scoop the Easter eggs up and then walk as quickly as they can to the other basket without dropping the egg. Students will continue playing and trying to get as many eggs to the second basket as they can!
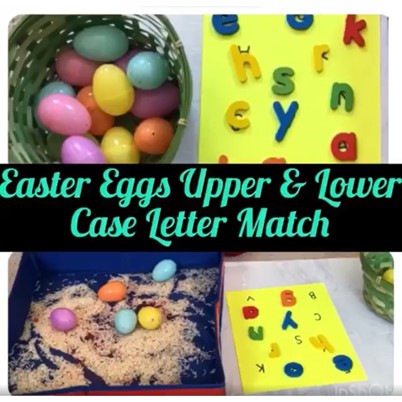
Easter Eggs Upper & Lowercase Letter Match
This sensory bin activity is perfect for students in preschool and Kindergarten as a way to practice identifying uppercase and lowercase letters while also brushing up on their fine motor skills.
Use this activity for literacy centers, as morning work, or an early finisher activity this Easter season!
Supplies Needed:
● Plastic Easter eggs
● Sand tray or plastic container
● Magnetic letters
● Sheet of construction paper
● Sharpie
● Sand or other sensory bin material
To Setup:
● First, grab a sand tray or plastic container. Fill it with sand or another sensory material.
● Gather the plastic eggs. Place a magnetic letter inside of each plastic egg. Then, put all of the eggs into the sand tray.
● Next, grab a sheet of construction paper. Write each of the letters of the alphabet on the paper.
● To play, have students open plastic eggs, identify the letter inside, and then match it to its corresponding letter on the sheet of construction paper.
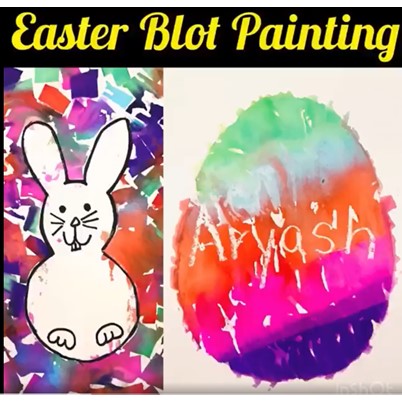
Easter Blot Painting
This super cute blot painting activity is the perfect Easter art project for toddlers! Using just a few supplies, preschoolers can bring their own watercolor painting to life.
With options to make an Easter egg or an Easter bunny, your students will love watching as their colorful masterpiece is created using a dropper.
Materials Needed:
● Printed bunny and egg printables
● Scissors
● Watercolor paper
● Crepe streamers
● Dropper or squeezer
● Water
● White crayon
● Sharpie
To Make:
Bunny Blot Painting:
● First, print off the free bunny printable, found here. Cut it out.
● Next, lay the cutout on a sheet of watercolor paper.
● Then, cut the multicolored crepe streamers into little square pieces. If your students are able to cut well, you can have them complete this step! Then, have students place the square pieces onto the paper surrounding the bunny.
● When students are finished, give them the dropper filled with water. Have them squeeze the dropper onto the piece of crepe paper. Let the paper dry.
● Once the paper is dry, pull up the pieces of crepe paper.
● Pull off the bunny cutout. Then use a Sharpie to draw an outline around the bunny and add your own face to bring it to life.
● That’s it! Students will be amazed at the beautiful blot painting they have created!
Easter Egg Blot Painting:
● First, print off the free egg printable, found here. Cut it out. You will use the outline of the egg for this activity.
● Next, lay the outline on a sheet of watercolor paper.
● Grab a white crayon and write the child’s name in the middle of the egg.
● Place the strips of multicolored crepe paper across the egg.
● Give students the water dropper and have them drop water on the pieces of crepe paper.
● Once it’s dry, peel the pieces of crepe paper off. Pull off the egg outline to see the beautiful watercolor masterpiece your students have created!
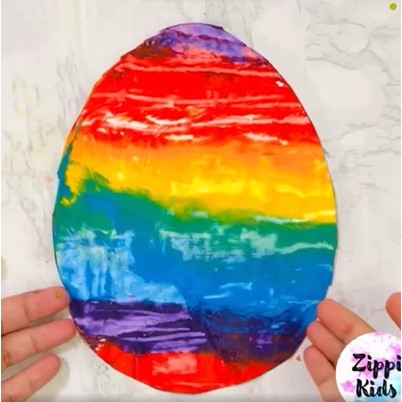
Easter Egg Scrape Painting:
This Easter art project is one that preschool kids will enjoy completing. The scrape technique is fun to complete and it looks cute too! Plus who doesn’t love implementing painting ideas that require minimal cleanup but that are still a lot of fun?
Grab a few supplies that you already have lying around your classroom or home and watch as students create this no-mess Easter egg.
Materials Needed:
● Craft paint in different colors
● Cling wrap
● A ruler
● An egg outline on a sheet of paper
To Make:
● First, print off an outline of an Easter egg. You can download one for free here.
● Next, gather your tubes of paint. On the left side of your Easter egg, squirt little daubs of paint along the left side on the egg’s outline.
● Place a sheet of plastic wrap over the sheet of paper, pressing down on the paint.
● Then, grab the ruler and have students drag it across the page starting on the side with the paint. They will drag the paint across the page to decorate their egg.
● When finished, pull the plastic wrap off. Cut the egg out and you have your finished product!
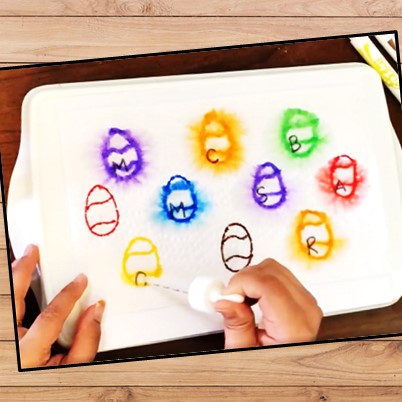
Rainbow Magic Eggs:
Looking for an Easter literacy activity for your Pre-K or Kindergarten students? You’ve found it! This is one of our favorite Easter activities to promote letter recognition while practicing fine motor skills.
Not only is this activity fun, but it is also always a hit for students because they get to use a spray bottle which just adds to the fun!
Materials Needed:
● A paper towel
● A piece of white paper
● Markers in different colors
● A Sharpie
● A spray bottle or dropper
● A tray or bin
To Setup:
● Grab a piece of white paper. Using a Sharpie, write letters on a piece of white paper.
● Next, grab a paper towel and draw multicolored Easter eggs on it. Be sure to draw the eggs in the same spots that the letters are on the sheet of white paper.
● Place the piece of white paper in a tray or bin with the paper towel on top.
● Fill a spray bottle or dropper and then have students get to work!
● Students will spray the Easter eggs and watch as a letter appears below. Students will say the name of the letter as it is revealed.
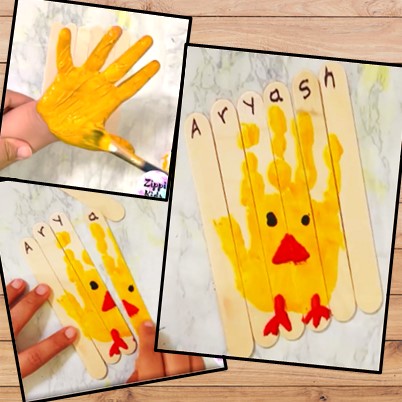
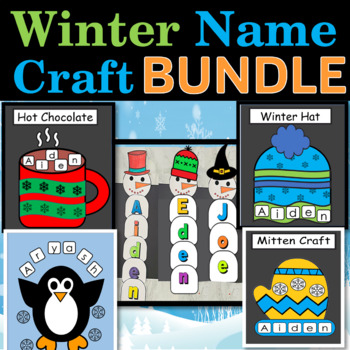
Spring Chick Handprint Name Puzzle
This Easter handprint craft is too cute! Whether you just use it to entertain your kids or simply as a keepsake, students will love building this name puzzle. It will also help preschool students learn how to build their name which is a valuable skill that they will use as they grow.
Grab a few supplies and help your students create their own handprint craft that they can use again and again to help build these important grade level skills!
Materials Needed:
● Popsicle sticks
● Tape
● Paintbrush
● Yellow paint
● Black paint
● Orange paint
● A Sharpie
To Make:
● Gather together the same number of popsicle sticks as letters in the child’s name.
● Place them together in a row and then tape the top and bottle to keep the popsicle sticks together and secured. Then, turn the popsicle sticks over.
● Grab the yellow paint and paintbrush. Paint the child’s hand with the yellow paint. Help them to place their painted hand down on the popsicle sticks. Press their hand down until all paint has transferred and then pull it away. Wash the child’s hand.
● Once the paint has dried, use the black paint to put eyes on the chick. Then, use the orange paint to add a nose and feet.
● After the puzzle is dry, grab a Sharpie and write one letter of the child’s name on the top of each popsicle stick.
● Then, take the tape off and mix the popsicle sticks up. Watch as the child practices building the puzzle and learning the order of the letters in their name.
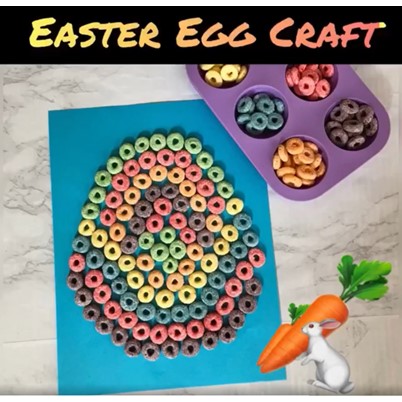
Easter Egg Froot Loops Fine Motor Craft
What better way to fill in an Easter egg than by using colorful Froot Loops cereal? Students will gain practice with making patterns, identifying colors, and using their fine motor skills.
If there is any, preschool students may even enjoy snacking on the leftover Froot Loops once their egg is filled!
Materials Needed:
● A piece of paper with an egg outline drawn or printed on
● Froot Loops cereal
● Glue
To Make:
● To complete this activity, print out or draw an egg outline onto a piece of paper the color of your choice.
● Spread glue in the middle of the egg until the entire egg is covered.
● Then, give students Froot Loops and allow them to fill in their egg using the Froot Loops.
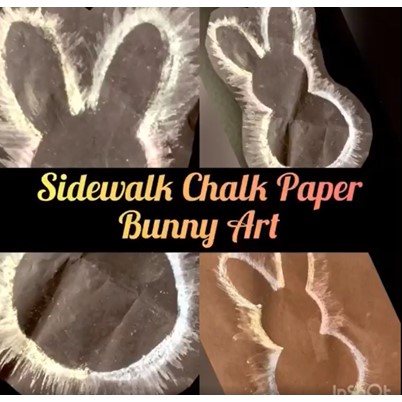
Sidewalk Chalk Bunny Easter Art
This sidewalk chalk bunny art gives kids practice with tracing. It’s simple to make and it’s cute to hang up in your classroom or home!
Just grab some chalk and a couple other supplies to help your Pre-K students make this adorable craft.
Materials Needed:
● A sheet of paper with an Easter bunny outline printed on it. Grab ours for free here.
● Scissors
● Black construction paper (another color will work but black works best!)
● Multicolored sidewalk chalk
● Small paintbrush
● Water
To Make:
● First, cut the bunny outline out of the sheet of paper.
● Next, place the outline in the center of a black sheet of construction paper.
● Have students grab the chalk and begin tracing the bunny using different colors and thick, bold lines.
● After tracing the bunny, have students dip a small paintbrush into water. Have students paint the chalk outline, painting in small strokes coming off of the bunny outline.
● Once the water dries, pull off the bunny outline. Grab your scissors again and cut out the bunny around the outside of the chalk line. Students will love how cute this multicolored bunny art is!
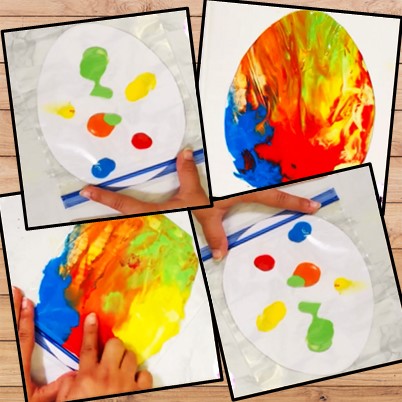
Egg in a Bag
This sensory Easter art activity is a fun way for students to have the excitement of painting without making a mess. Perfect for Pre-K and Kindergarten students, this activity allows students to show their creativity while also learning about color mixing.
Grab some paint, a Ziploc bag, and an Easter egg cutout, and you’re ready to bring this sensory bag to life.
Materials needed:
● Easter egg cutout
● Craft paint in different colors
● Ziploc bag
To Make:
● Cut the shape of an Easter egg out of white paper. You can also download a cutout here.
● Next, squirt globs of paint in different spots on the egg.
● Then, carefully slip the egg into a Ziploc bag. Seal the bag the best you can. It’s fine if it won’t seal all the way.
● Have students push the paint around the egg using their fingers. Have them continue painting until the entire egg is covered.
● Their finished product is something they’ll be proud of!
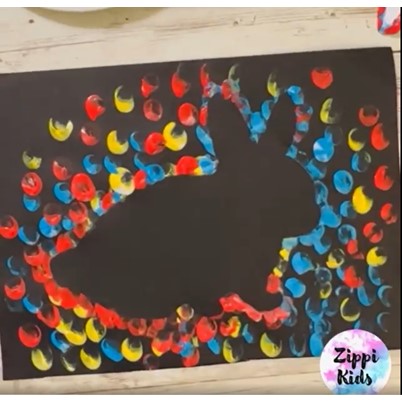
Bunny Silhouette Fingerprint Art
Easter crafts don’t just have to be cute. Thankfully they can also serve a purpose in the development of our children. This fingerprint art activity is more than a precious keepsake for parents. It’s also an easy way for students to practice using their fine motor skills which they will need to strengthen and grow as they get older.
Activities like this one are a great way for preschoolers and kindergarteners to strengthen those skills while still having fun and creating something cute.
Materials Needed:
● Bunny outline cut out of paper
● Black construction paper
● Tape
● Craft paint in different colors
● A paper plate
To Make:
● Take the bunny outline cutout and place it in the center of a sheet of black construction paper. Use a small piece of tape to prevent the bunny outline from sliding.
● Squirt globs of paint onto a paper plate. Consider using white to help brighten up the different colors.
● Then, have students dip their finger into the paint and dot the paper around the outline of the bunny. Have students continue dotting and using different colors until the bunny outline is completely filled in.
● Once the paint has dried, pull off the bunny outline and take a look at the masterpiece students have made!
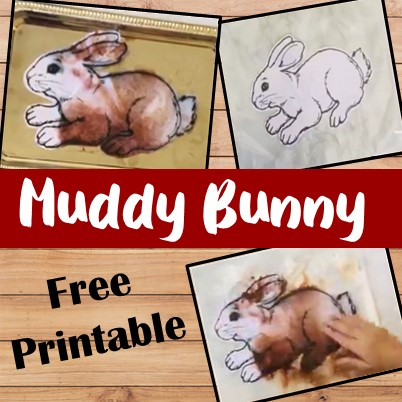
Muddy Bunny Sensory Art
This muddy bunny sensory Easter art project is incredibly fun for preschool students. It’s a no mess, low-prep activity that your students will want to complete again and again!
Grab shaving cream, brown paint, and a couple other things and watch as your students get this bunny muddy.
Materials Needed:
● Shaving cream
● A Ziploc bag
● Brown craft paint
● A bunny outline
To Make:
● Grab your bunny outline and place it into the Ziploc bag.
● Next, squirt some brown paint and shaving cream into the bag onto the bunny outline.
● Then, allow students to begin painting by moving the shaving cream and paint around the bag.
● When they finish, the final product will be a very cute but muddy bunny!
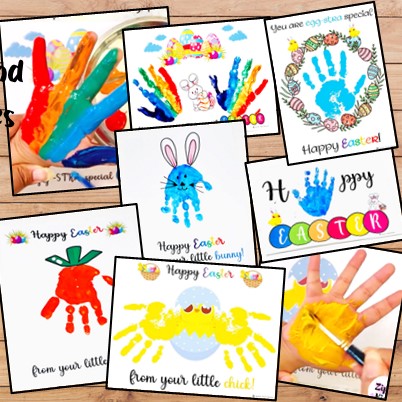
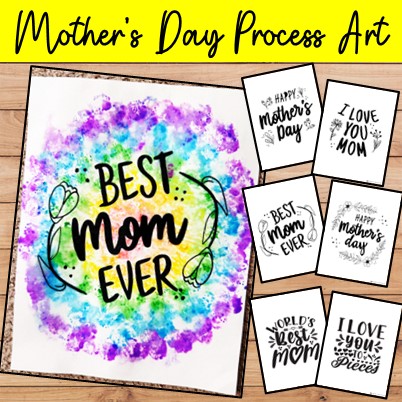
Easter Handprint Art
Looking for an Easter handprint art activity? This one is a perfect keepsake for students in Pre-K and Kindergarten. With 8 different designs to choose from, your students will enjoy choosing their favorite print to put their handprint on.
These are perfect for a bulletin board or for displaying at home. Just print them onto cardstock or plan to laminate after students are finished.
Materials Needed:
● Easter handprint printables
● Cardstock or printer paper
● Ink
● Paint
● Paintbrush
To Make:
● Grab cardstock or printer paper and print the different designs. If working with multiple students, consider allowing them to choose which design they like best.
● Paint students’ hands and place it on the designated spot on the paper. Once it has dried, laminate the paper if it is printer paper.
● That’s it! Your students have created a beautiful memento using their handprint.
We hope you enjoy these Easter crafts and activities this spring! From Easter art projects, games, and more, these resources are sure to help your preschool and Kindergarten students get into the Easter spirit while creating some fun things along the way.

Hands-on craft and art ideas,
activities, printable and digital resources for preschool and kindergarten kids